7/31/2012

CTMH Artiste in August Blog Hop

Welcome to the first day of the Artiste in August Blog Hop!  This is a circular hop and the incredible Pamela O'Connor is the blog in front of mine.  We are a group of Close to My Heart Consultants who decided we wanted to showcase our brand new Close to My Heart Exclusive Cricut Artiste Collection that you can order beginning TODAY!  Each day we will be focusing on a different shape or box that you can cut out with this incredible cartridge.


The shape that we are focusing on today is the Magazine File found on pg 47 in the Cricut Artiste Handbook and pg 18 in the Cricut Artiste Assembly Book.  I used CTMH New England Ivy cardstock to make the actual box.

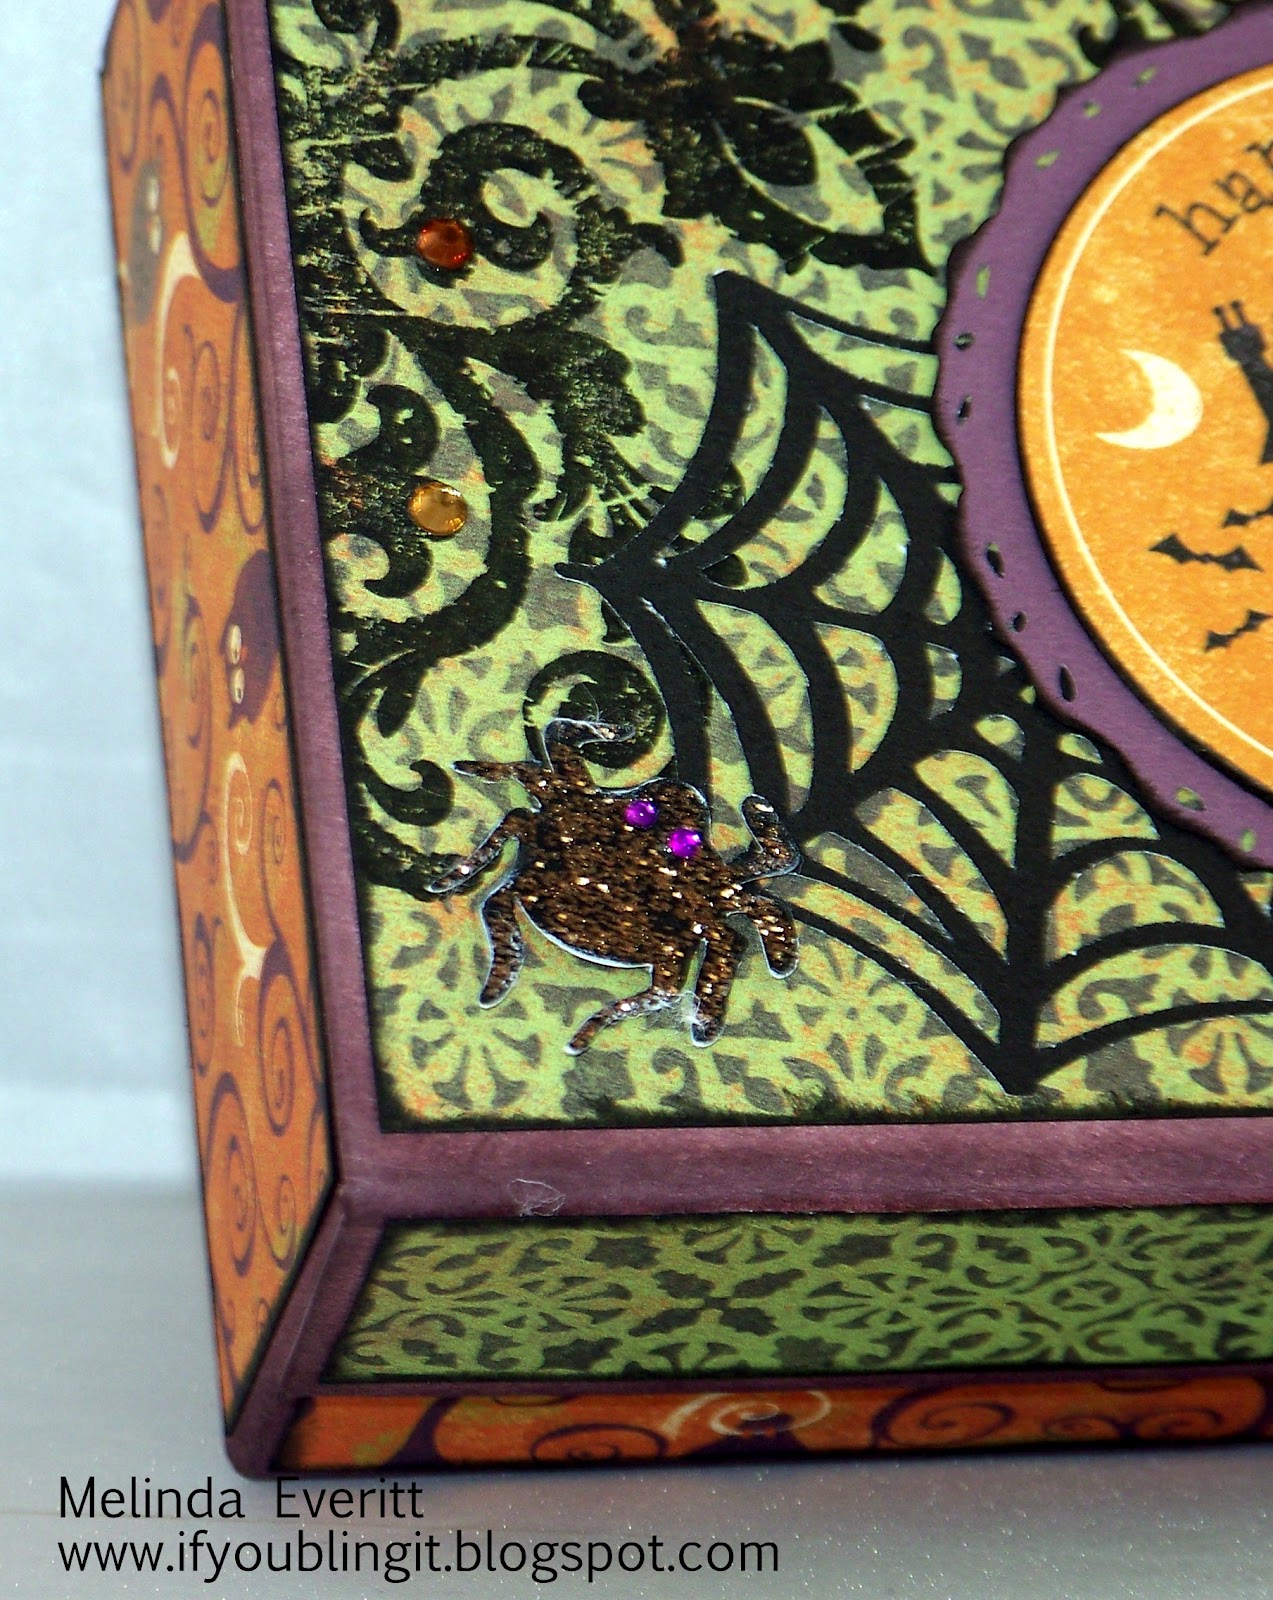
In the Cricut Artiste Handbook, it said to cut the Magazine File out at 6".  To decorate the Magazine File, I cut a sheet of our gorgeous Pear & Partridge Paper Packet (X7162B) at 5.75".  I sponged all of the edges of both sheets of paper with New England Ivy Dye Ink.  I then scored and folded the base of the Magazine File.  I opened it back up and adhered the patterned paper to the base and then folded it back together, using my bone folder to get a good crisp fold.  Whatever you do, do not score and fold the patterned paper and try to adhere it after you do.  Ask me how I know.  LOL  The "spine" will be smaller than the base and it will not work.  Again, ask me how I know .....  I SO try to make mistakes work before I abandon them.

The patterned paper did not reach all of the way to the smaller part of the sides so I used a bit of the zip strip to "hide" that "flaw".  Then I embellished the paper with bling and filled the Magazine File with the Christmas Cards I made using the Pear & Partridge Cardmaking Workshop on the Go (G1043).  These are the cutest cards and I love that they are in a kit that you could take to a crop and put together 15 cards complete with ribbon and bling.

Wouldn't this be a fantastic gift?  I think that I would put it in a cello bag, wrap the top with ribbon and cut out a cute tag with my CTMH Cricut Artiste Cartridge to finish it off.  Here is another view of this elegant Magazine File.


I also wanted to show you the Cricut Artiste Handbook page that shows the Magazine File.


And then what is really new and exciting about the Artiste Cartridge is the Assembly Book that comes with this cartridge.  It shows you how to put the 3D projects together.  Loving this!


Now let me tell you something about the CTMH Cricut Artiste Collection pictured below.


  • The Cartridge has 700 images - Themed Projects, Cards, Font, and 3-D Items
  • Has 3 My Acrylix D-size Stamp Sets that coordinates perfectly with the shapes cut out by the Artiste
  • Has 3 Coordination 12" x 9" Dimensional Elements Sheets including a Mini Album
Contact me today to get the entire collection  for just $99 (retail value of nearly $125) or you can place your order on my website.

Now please continue hopping.  Your next stop will be the very talented Michele Eickholt's Blog.  

And then please come back tomorrow!  This Blog Hop goes all August long.  See you tomorrow!


CTMH August Stamp of the Month Blog Hop

Welcome to the August Stamp of the Month Blog Hop.  I am the next stop in this blog hop following  Angel Sawyer's Blog.   We have almost 60 Close to My Heart Consultants participating in this month’s Stamp of the Month Blog Hop.
                                                                                                                        

The August Stamp of the Month is entitled Baroque Borders (Set of 5). Here is a picture of this stamp set:


This stamp set has a Moorish feel to it for me.  Let me tell you, I really tried to not use it for Halloween.  I was going to do a pretty card for Christmas and emboss it with Gold Embossing Powder.  But Halloween was screaming out to me!

I used our My Creations Card Box (Z1647) that has a magnetic closure and made this super cool box for Halloween.  I am going to participate in blog hops all month long and am going to add to this box, so please be sure and come back to see what I can do with it to make it a finished gift.


I am so excited with what Close to My Heart has done with our papers and accessories with our new 2012 Autumn/Winter Idea Book.  We have so many choices of accessories, paper and inks to craft with.  Loving it!  This is the new Moonlight Paper Packet (X7161B) and I used the round Happy Halloween sentiment from the Moonlight Complements Dimensional Elements (X7161C).  I cut the Spider Web and the Spiders with our new Close to My Heart Exclusive Cricut Artiste Cartridge (Z1790), which has THEMED Keys!  No more hunting around looking for the shape you want to cut.  

Look at my cute little spiders.
                                                                                                           
Can you see him?  It is hard to get him in the picture, but I cut him out with the Cricut Artiste, put some of our new Bronze Glitz Glitter Gel on him so that he would stand out and then gave him some purple bling for eyes.  I decided that he still needed to stand out better so I took a Q-tip with our Daisy White pigments ink and inked around his edges.  Some of the cotton from the Q-tip got caught on him, but I left it because gave the look of Spooky Spider Webbing.  Too Cool!

Here is a view of the inside of the box.


See how I lined the inside of the box?  This was super easy to do.  I edged the paper with our new black pigment ink from our mini pigment pad sets.  I sponged the edges of the box itself with Smokey Plum dye ink before I adhered the patterned paper to the box with our wonderful Bonding Memories Glue (1512).  It was SO easy to use.

Here is another picture of the front of the closed box.


See the little jewel on the front of the box?  It is from the Moonlight Coordinating Product, Haunted Assortment (Z1741).  In this assortment you will find skulls, jewels and decorative brads.  They go great with the Moonlight Paper Pack.  The jewel I used was self adhesive.

 I really want to thank you for visiting my blog. The next stop on the blog hop is the Fabulous  Jen Patrick.
                                                                                                                    
You can make this card box yourself with supplies purchased here.  The stamp of the month stamp set can be purchased for $$17.95 or you can even get it for only $5 between August 1 – August 31, 2012. If you do not have a Close to My Heart Consultant, you can purchase this stamp set on my website.

7/30/2012

One More Day Until You Can Get Your Free Tote Bag!


Join Close to My Heart in August and get this darling Damask Tote Bag Free!
This is a gorgeous tote and is so roomy.  It is 17" x 17" x 6".  It has a large exterior pocket for 12" x 12" paper packets.  The huge interior can hold a 12" x 12" album and more.  There is a small, zippered interior pocket.  The fabric is coated-canvas for durability and easy cleaning.  On the sides there are 2 water bottle pockets.  You can wear this tote on the shoulder, across the chest, or as a backpack.  Large flap snaps keep it closed.


So, how do you get this beautiful tote?  All you have to do is sign up to receive the Close to My Heart new Consultant Kit for $49.  In the kit you will receive $130 of new product from our new Autumn/Winter 2012 Idea Book.  No further purchases are required and you get to keep the tote and the products even if you do not purchase anything else.  The $49 is the cost of the new Consultant kit.  The Damask Bag is free.

New Consultant Kit


Contents of the New Consultant Kit:  

CONTENTS OF THE NEW CONSULTANT ESSENTIALS KIT INCLUDE:


  • My Acrylix® Nature's Delight Petite Perks™ Stamp Set (W2023) 
  • Workshops on the Go™ Avonlea Kit (G1045)
  • Avonlea Complements Canvas Shapes (X7155C)
  • My Creations®Recipe/Photo Box (Z1322)
  • Color-Ready Canvas Alphabet (Z1777)
  • Chocolate Exclusive Inks® Pad (Z2111)
  • Slate Exclusive Inks® Pad (Z2173)
  • My Acrylix®Glamour Lowercase Stamp set (D1522)
  • My Acrylix® Perfect Fit--Frames Stamp Set (D1527)
  • 3" x 3" My Acrylix® Block (Y1006)
  • 2" x 3 1/2" My Acrylix®Block (Y1009)
New to Close to My Heart products?  This would be an awesome package for a new stamper,  You get everything you need to make some gorgeous projects, cards, and scrapbook pages.


Beginning August 1st at 10:00 am (CDT), for only $49 you will receive our new Consultant kit plus the Damask Convention bag.  Another bonus is that you will receive a 22% discount on all of your purchases from our gorgeous new Idea Book.  

This is a "while supplies last offer" and the number of bags is very limited so if you are interested, sign up on August 1st at 10:00 am (CDT).  


Click here to contact me if you have any questions or would like more information.  This special does not start until August 1st at 10 am (CDT). 


On August 1st you can sign up here to get your free Damask Tote Bag.

7/25/2012

My Last CTMH Convention Studio J Layout

This is my last Convention Studio J layout that I made.  I was going to talk about all of the gorgeous techniques that I used to make this layout but instead I think that I will talk about what this layout means to me.
melindaeveritt_convention2012_-_5
This layout was the hardest one for me to create.  Not because it had difficult techniques, but because of the photos and the journaling. 


Even blogging about it is hard.  I have enjoyed card making and paper crafting but scrapbooking has been so paralyzing and I believe it is because of the relationship I had with my father. 


Dad was an alcoholic.  As a military wife and mother, moving away physically also allowed me to move away emotionally and it was a total relief.  But I craved a relationship with my father.  After 17 years apart, I flew to Las Vegas and saw my father again.  We forged a new relationship which I enjoyed until he died a few years ago.  The pictures in the above layout was from when Dad came to Memphis to meet his great granddaughters for the first time and have Thanksgiving with me and my daughter’s family. 


After I placed the pictures in the photo wells I had to walk away and come back the next day to journal.  With tears in my eyes, I finished the journaling and sent it off.  Sometimes scrapbooking can be about more than your pictures.

7/18/2012

Free Exclusive Tote Bag

One of the most exciting happenings at the Close to My Heart Convention each year is when they hand out the exclusive specially made Convention bag filled with goodies to the Consultants.  And now Close to My Heart is offering this super adorable damask bag absolutely free.
This bag is a full sized bag that can carry tons of paper packs and papercrafting supplies.  And you know what?  This bag will come filled with more goodies than we received at Convention!! What you will receive is pictured below and a list of your goodies can be found here.


Beginning August 1st at 10:00 am (CDT), for only $49 you will receive our new Consultant kit plus the damask Convention bag.  It contains $130 of new product from our new Fall/Winter 2012 Idea Book.  Plus you will receive a 22% discount on all of your purchases from our gorgeous new Idea Book.  


No further purchases are required and you get to keep the tote and the products even if you do not purchase anything else.  The $49 is the cost of the new Consultant kit.  The damask bag is free.


This is a "while supplies last offer" and the number of bags is very limited so if you are interested, sign up on August 1st at 10:00 am (CDT).  


Doesn't this kind of remind you of Costco or Sams?  Except here you pay a small fee and get back more than triple the amount you paid.  Sounds like a great deal to me.


Click here to contact me if you have any questions or would like more information.  This special does not start until August 1st at 10 am (CDT). 


On August 1st you can sign up here to get your free damask Convention bag.

7/17/2012

Close to My Heart Retiring Items

Sniff, sniff......

In order to keep Close to My Heart vibrant and up to date, we have to retire items with each new catalog.  Some of my very favorites are being retired including 24 of our gorgeous colors.  

Close to My Heart is changing the way they approach colors and this is important for you to understand so that you can decide what to do this month.  These colors may not actually be going away exactly.  In many of the future paper packs you will still find these colors and they will be called seasonal colors.  What that means is that your level 2 paper pack will contain 2 pieces of the seasonal color, but you will not be able to purchase ink, reinker or additional cardstock in these colors.

So, what I am doing is making sure that I have additional cardstock in the retiring colors for myself.  Plus if I did not have the ink stamp pads and the reinker, I would purchase those as well.  Reinking your stamp pads will allow them to remain usable for years.

With all of that said, here are the retiring products in slide shows put together by sister consultant, Tamytha Jenkins.  We are retiring so many products that they had to be placed into 3 slide shows.


These products are orderable until July 31, 2012.  There are a few ways that you can order these products and receive free merchandise. 

1.  I can set up a virtual gathering for you and a link will   
     be placed on my website which you can share with 
     your friends.  They can order using the link and you 
     will receive hostess rewards just as if you had a 
     gathering.

2.  I still have dates open where I can hold a gathering 
     at your house and you will receive hostess rewards 
     based upon your sales.

3.  You can go to my website and place an order and if it 
     is $75 or more, you can take advantage of the Perfect 
     Pairs promotion and receive a free level 2 paper pack 
     and an accompanying embellishment.  Details about 
     this promotion can be found here.

4.  You could have a catalog party and will receive 
     hostess rewards based on your sales.

Interested?  Here is a link to the hostess rewards table to see how much free and half priced product you could receive.

If you are interested in buying just a few items, you can email me or call me at (901) 218-1847 or (901) 850-1836 and I would be happy to place an order for you.

7/07/2012

Studio J Gator Wrestling

My 4th Studio J layout absolutely makes me laugh out loud.  It shows an outing that I had in 2000 with two of my sons.  We went to visit my brother, who worked at Gatorland near Orlando, Florida.  My brother actually wrestled alligators during the show they put on at Gatorland.  After the show was over, he put duct tape around the gator, Mr. Happy, and told my sons to climb on (one at a time) so that they could see what it was like to wrestle an alligator.  I, of course, saw a photo op and immortalized this super fun experience.
melindaeveritt_convention2012_-_4
This is another one of the Close to My Heart Convention Studio J Layouts.  I changed the colors to match my photos.  I just love how it came out. 
With this layout I learned how to use a My Stickease image to make a border, how to create a layered ribbon bow, and how to create a striped ribbon using a text box.  
My son is going to absolutely love this layout when he sees it.  I may even frame it instead of putting it into a scrapbook.                                                                                                                                                                                 

7/05/2012

Faux Stitching Tutorial

With the photographic assist of my husband, I have that Faux Stitching Tutorial I promised.  Here is the card that I made using the Faux Stitching.
1-Tree Card
Believe it or not, there is no gel pen involved!  Here is the step by step tutorial.  First of all, you must use cardstock with a white core for this technique.  Patterned paper and cardstock without white core will not work.
Step 1 – With a pencil draw a line 1/4 inch from the outside of the card on the wrong side of the cardstock.
1-Faux stitching 18
Step 2 – Using a paper cutter that has a deep “trough” and the larger end of your dry embossing tool, place the line that you drew over the “trough” and gently rub over the line that you drew.  I go over it a few times gently with the larger end of the tool, then a couple of times with the smaller end, and then again with the larger end.  Make sure that you do not tear the paper. Repeat on all four lines that you drew.
1-Faux stitching 15
Step 3 – Turn the cardstock over to the front.  See the ridges that I dry embossed?
1-Faux stitching 13
Step 4 – Pick up your sanding block and gently sand over the lines that you dry embossed.  You are sanding on the front of the cardstock where the lines are raised.  Keep the sanding block perpendicular to the cardstock and try real hard not to sand any of the cardstock that is not raised. 
1-Faux stitching 2
Sand over all four lines.
1-Faux stitching 12
See my sanded dry embossed lines?  I slightly sanded a few spots near the lines, but all-in-all a pretty good job.
1-Faux stitching 9
Step 5 – For this step I used my Close to My Heart ruler and my paper piercing tool.  I placed the paper piercing tool straight up and down and using the larger spaced holes on the ruler pushed straight down.  I continue piercing until I get to the end of the line.  Then I repeat down each sanded line.
1-Faux stitching 8
1-Faux stitching 7
And the finished faux stitched cardstock.
1-Faux stitching 5-001
Not bad, huh?  I love this technique.  If you try it, post your blog link in the comments so that I can visit your blog and see your artwork.

7/02/2012

Perfect Pairs, CTMH’s July Promotion

Close to My Heart is giving you one more chance to get some awesome retired products and at a good price!  Absolutely FREE!

Jul2012CC_ImageGallery

Place an online order of $75 or more in July and you will receive a popular paper packet and coordinating accessory - A Perfect Pair - FREE!!! That's a retail value up to $17.90! Different Perfect Pairs are available on different dates throughout the month, so you will want to place more than one qualifying order to snatch up several Perfect Pairs! Place your order early in the availability period, as the promotion is while supplies last.

Here are the dates available for each set of Perfect Pairs.

Order Dates        Perfect Pair                                                       Retail Value

July 1-5               Mischief Paper Pack and Midnight Felt Shapes                  $15.90

Mischief July            midnight felt July

July 6-10             Dreamin' Paper Pack and Harvest Charms                       $14.90

Dreamin July            Dreamin embellies

July 11-15           Fanfare Paper Pack  and Fanfare Level 2 Assortment        $17.90

Fanfare July             fanfare assortment

July 16-20           Lucky Paper Pack and Lucky My Stickease                       $17.90

Lucky July            Lucky My Stickease

July 21-25           Mayberry Paper Pack & Mayberry My Stickease                 $17.90

Mayberry Level 2 Paper           Mayberry My Stickease

July 26-29            Sophia Paper Pack and Sophia My Stickease                   $17.90

Sophia Level 2 Paper Packet          Sophia My Stickease

July 30-31            Believe Paper Pack and Holiday Pockets OR

Believe Paper          holiday pockets

                           Wonderland Paper Pack and Wonderland My Stickease   $14.90

Wonderland Paper          Wonderland My Stickease

Ready to order? Click here to begin shopping.  Remember that the Mischief Perfect Pair is only available until July 5th and only as long as supplies last.

7/01/2012

CTMH 3rd Studio J Layout

Today I am sharing the third Studio J Layout I made for the Close to My Heart Convention.  This page is of my almost 14 year old grandson.  Can you tell that I am a bit behind in my scrapbooking?  LOL
melindaeveritt_convention2012_-_3
Austin was so funny as a baby.  When he would see a camera pointed his way, he would stop doing what he was doing and give us a big smile.  Even if he was crying hysterically!  It became great fun (for us) when we would see him crying to pick up a camera, point it at him, and watch him smile.  Then we would put it down and he would resume crying. 
                                                                                                                        I just love what I can do with Studio J.  Look at all the stitching!  And I didn’t even have to bring out my sewing machine.  I also love that I can resize the stickease to the size I need.  Can’t do that in real life.
                                                                                                                    How would you like to play with Studio J?  It is free to play with and you don’t even have to load the software onto your computer.  Check it out here and link to my page to show off what you created.  i cannot wait to see your creations with Studio J.  Remember that I am a beginner scrapbooker and I think that my layout looks pretty smart.  You can do it too!