12/14/2012

Let Me Show You How Easy It Is to Put Together the Whooo's Your Valentine Treat Tubes


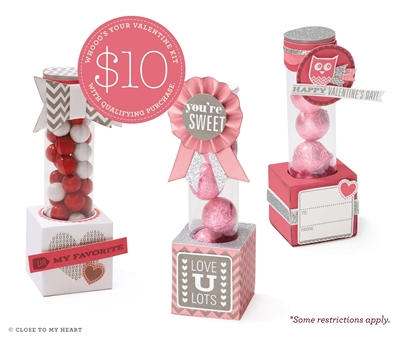
I am absolutely LOVING this promotion and the super cute stamp set that comes with it.  SO much that I wanted to share with you a video that shows you how easy it is to put our treat tubes together.  I can really see how much fun this would be for you to get together with your kids and grandkids and make enough treat tubes to give out as classroom valentines.  Now wouldn't that be the best Valentine that they receive!

So how do you get this adorable kit that is worth $40?  So glad you asked.  When you place an order of $35 or more in Close To My Heart products, you’ll receive the Whooo’s Your Valentine kit for only $10. Qualifying purchases must come from Autumn/Winter 2012 Idea Book product (or products live on   my website   through January). 

Here is what you get in this promotion:

12 – Die-Cut Boxes (3 each of 4 colors: Blush, Hollyhock, Ruby, White Daisy)
3 – 12" × 12" Cardstock Sheets (Blush, Hollyhock, White Daisy)
1 – Sheet Silver Glitter Paper – new product for Spring/Summer 2013!
12 – Treat Tubes with Lids – new product for Spring/Summer 2013!
1 – My Acrylix® Whooo’s Your Valentine Stamp Set (D-size)


Isn't this promotion incredible?  Head on over to my website and get your own Whooo's Your Valentine.  
This promotion is available through January 31, 2013.

12/12/2012

Whooo's Your Valentine Blog Hop

Can you believe that I am already making something for Valentine's Day?  This is in celebration of Close to My Heart's latest promotion entitled Whooo's Your Valentine.  This promotion starts on December 13th and run through January 31, 2013.  It is our National Papercrafting Month super duper promotion.

Aren't you just loving it?  When you place an order of $35 or more in Close To My Heart products, you’ll receive the Whooo’s Your Valentine kit for only $10. Qualifying purchases must come from Autumn/Winter 2012 Idea Book product (or products live on   my website   through January). 

Here is what you get in this promotion:


12 – Die-Cut Boxes (3 each of 4 colors: Blush, Hollyhock, Ruby, White Daisy)
3 – 12" × 12" Cardstock Sheets (Blush, Hollyhock, White Daisy)
1 – Sheet Silver Glitter Paper – new product for Spring/Summer 2013!
12 – Treat Tubes with Lids – new product for Spring/Summer 2013!
1 – My Acrylix® Whooo’s Your Valentine Stamp Set (D-size)

Isn't this promotion incredible?  Head on over to my website starting December 13th and get your own Whooo's Your Valentine.

We have 32 Close to My Heart Consultants in this Blog Hop who are going to show you what they did with this awesome kit besides the picture above.  If you found yourself here from Katy Donaldson Taylor's Blog, then you are in the right place.  This is a circular hop so just follow the hop from blog to blog to see all of the awesome artwork.

For this blog hop, I made a cute little bag using the Cricut Artiste.


This darling little bag is cut out of Ruby Cardstock from the Cricut Artiste Cartridge.  You can find it on pg 56 of the Cricut Artiste handbook.  It is the Shift cut at 4 inches.  I wanted a white doily look so I decided to heat emboss the doily part of the bag with Versamark and White Embossing Powder.  Here is how it looks right after I have heat embossed it.


I used post-it notes to mask off the doily part of the box and then just rubbed the Versamark pad over that part.  I then removed the post-it notes and poured the white embossing powder over the doily part.  Then I heat embossed it.  I love the look.  Hope you do too!

Take a look at my owl.  I inked up the bottom part of the owl in Ruby Ink and the top part in Archival Black.  It was so easy to do and I think the owl is so cute!  I cut the scallop shape on the Cricut from the Silver Glitter paper that came in this kit.  The shape is from the Cricut Art Philosophy and it was cut at 1.75 inches.  I am so jazzed that the glitter paper can be cut on the Cricut!

Here is a look at my little owl cluster.  The black bow was cut  from the Cricut Artiste cartridge, pg 55, at 5 inches.  I finished my owl off with 2 red sparkles.  Loving all of the glitter and sparkles!  It's all about the BLING! 


Here is one more picture of my owl gift bag.  Not the best picture but I just realized that in my other pictures it did not look like a bag.


I want to share a picture of this adorable stamp set.  It is a must have set!


I am going to put some 3" x 3" cards in my bag and give them to some friends.  You could put a treat in them or even a card and a treat.  I will post my cute little cards when I finish them so that you can see what else I can do with this stamp set.

Now it is time for you to go to your next stop, Michelle Loncar's Blog.  Thanks for visiting and if you like what you see, I would love for you to become a follower of my blog.  You can follow it with the link on the sidebar.


12/01/2012

Close to My Heart December Stamp of the Month Blog Hop


Welcome to the December Stamp of the Month Blog Hop.  My blog is following Traci Godbee's Blog.   We have 60 Close to My Heart Consultants participating in this month’s Stamp of the Month Blog Hop and I am so excited that you are visiting my blog.  If you like what you see, I would love it if you would hit the follow button on the right side of my blog!
                                                                                                                
The December Stamp of the Month is entitled Year-Round Cheer (Set of 12). Here is a picture of this stamp set:


I think that this stamp set is so darling that I had to use all of the stamps in my artwork.  I loved the way each stamp stood for a different month.  So what did I make?  I made a Perpetual Calendar with our Dakota Paper Pack.  You ask what is a Perpetual Calendar?  My calendar consists of a month that can be changed as the month changes and 2 cubes that have numbers on them.  You turn the cubes to indicate what the date is.  

Dakota has turned into one of my favorite paper packs. I really like the wood grain on one of the patterned papers from this paper pack. It made a very realistic looking base for my calendar.  Let me show you a few of the months.


March


May


February


Look at my spooky black cat for October!


I wish that you could see it but my pumpkin pie even has a dollop of whipped cream on top.

December

I made a drawer that fits below the base to help stabilize my calendar and to store the months and each month's oval decorations.  The months are held on with our hook and loop dots.  


List of Supplies
Dakota Paper Pack (X7157B)
Year-Round Cheer (S1212)
Hero Alphabet (E1022)
Cricut Artiste (Z1790)
Cricut Art Philosophy (Z1686)
My Creations Collage Cubes (Z1737)
Foundry Binder Clips (Z1711)
Durables Round Studs (Z1706)
Hook & Loop Dots (Z1805)


The next stop on the blog hop is the Fabulous Pamela O'Connor's Blog.

The Capture the Date stamp set can be purchased for $17.95 or you can even get it for only $5 between December 1 – December 31, 2012. If you do not have a Close to My Heart Consultant, you can purchase this stamp set on my website.