5/31/2013

Close to My Heart Stamp of the Month Blog Hop - A Flowering Bunch


Welcome to the June Stamp of the Month Blog Hop.  This month I am following Dawn Ross' Blog.   We have over 60 Close to My Heart Consultants participating in this month’s Stamp of the Month Blog Hop.   
                                                                                                                
The June Stamp of the Month is entitled A Flowering Bunch (Set of 10). Here is a picture of this stamp set:


Isn't this a darling stamp set?  I have seen artwork using it in different ways, but I have been waiting for this set to go live because I wanted to color it in with more than one or two colors of our alcohol markers.  

I had saved a tutorial by Betsy Veldman on my Pinterest board on how to stamp on canvas bags.  Close to My Heart released small canvas bags in our last catalog.  But I was more than a little intimidated by the idea of stamping on them because you get one chance to get a good image stamped.  Plus the ink does not stamp very vibrant onto the canvas.  I have never tried to use our alcohol markers with our canvas bags, but I imagine that you have to be very careful coloring in the image so that the ink does not spread past the stamped image.

The tutorial used HP Iron On paper for the image and made it look really easy.  You stamp on the HP transfer paper, color your image as desired, and using a very hot iron you quickly iron the image with the image side down onto the canvas bag.  When I say to iron quick, I mean iron quick - the canvas scorches easily.  

Usually I iron one more time quickly behind the images on the reverse side of the canvas bag.  I let it cool and then slowly and gently remove the paper backing, making sure that the transferred image stays attached to the canvas bag.  If I see that the image is still sticking a little to the transfer paper backing, I stop pulling and go over it one more time with the hot iron.  Then I try removing the transfer paper backing.

I bought this canvas bag at a local store and it was dirt cheap.  I have a downline who does machine embroidery and she embroidered the saying on the bag.  Here is my bag:


And here is a close up view of the stamp images on the bag:


Supplies Used
A Flowering Bunch Stamp Set (S1306)
Black Pigment Ink 
Markers Used (From Bottom to Top):
Sky Alcohol Marker
Outdoor Denim (Light) Alcohol Marker
Cranberry Alcohol Marker
Hollyhock Alcohol Marker

The next stop on the blog hop is the Fabulous Tamytha Jenkin's Blog.

The A Flowering Bunch stamp set can be purchased for $17.95 or you can even get it for only $5 between June 1 – June 30, 2013. You can purchase this stamp set as well as any of the above supplies here:  on my website.  

5/28/2013

Shabby Chic Tag


A group of local gals invited me to participate in a swap.  We were each to make 12 Shabby Chic tags.  My first impulse was to say no.  I am pretty busy and I have never made a tag, much less a Shabby Chic tag.  But I was excited to be included that I decided to go ahead and say yes and to do some S-T-R-E-T-C-H-I-N-G.

I got onto Yahoo and did an image search and you know what I found out?  That apparently almost anything goes.  Or at least others were as clueless as me on what Shabby Chic means in the papercrafting industry.  Not overly reassured, but at least I had company.

First I decided that my excursion into the Shabby Chic field would include a retired Close to My Heart paper pack called La Belle Vie.  I guess I wanted to go French Shabby Chic.  Then I pulled out 3 CTMH stamp sets, Jardin (D1528), Bonjour (C1519), and the retired stamp set from the La Belle Vie Workshop on the Go (C1519).

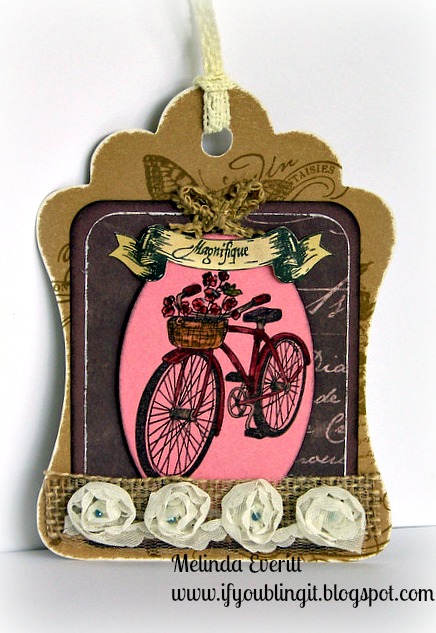
Here is my Shabby Chic Tag.


I am actually love, love, loving how this came out.  I don't know if it is really Shabby Chic but I think it is pretty.  I cut the tag out pf Desert Sand Cardstock with the CTMH Cricut Artiste cartridge, pg 32, Accent 1, 5.5" (height).  I then sanded the edges and then did some random stamping with Desert Sand Ink so that it would not be so plain.  

The next layer was cut out of a special color only available in the La Belle Vie paper pack, La Belle Vie Mauve at 4" x 3.25".  I rounded the corners and inked the edges with Black Ink.  The patterned paper was cut at 3.75" x 3".  The corners were rounded and I took the edge of my scissors and roughed up the edges.

I then took Blush Cardstock and cut an oval out at 3.25" x 2.25".  I have a Gypsy and that is easy to do.  I am guessing that you can probably do the same with the Cricut Craft Room.  I stamped the adorable bicycle from the La Belle Vie Scrapbooking Workshop on the Go with our black archival ink and then using my waterbrush, colored the bicycle in.  My basket came out a bit blah (I used Desert Sand to color it) so I went over it with my Creme Brulee light marker and it brightened it up.


I have a love/hate relationship with embellishing.  Embellishing takes me longer than the making of the artwork.  I knew that I wanted to use our Colonial White rosette ribbon and I was almost positive I wanted to use the Burlap ribbon and the Colonial White Crochet ribbon (retired), but the rest just happened.  The Magnifique is a stamp from the  La Belle Vie Scrapbooking Workshop on the Go.  It was cut with Colonial White Cardstock with the CTMH Cricut Artiste at .75".  I stamped it in black and then did a waterwash with Desert Sand reinker and my waterbrush.  I wanted it antiquey looking.  The cute little bow above it was a bear to tie.  It is the edging from the Burlap Ribbon that I used under the rosettes,

Everything is popped up because I have to have dimension and all of the ribbons are attached with my favorite liquid adhesive, Liquid Glass.  I put little grey opaques inside the rosettes to add interest and applied some Liquid Glass to the flowers in the basket so that they would have a little Oomph!

So there you go, my Shabby Chic Tag.  Hope you like it.

See anything you would like to buy?  Then travel on over to my website and do a little shopping.  You can even see our catalog there.

5/23/2013

Footloose Mini Album

Just wanted to share some quick pictures of the Footloose Mini-Album that we will be making on June 8th or June 9th.  I started this album last year when Footloose was still a current paper pack.  I intended to hold this workshop then, but we got busy with buying a house and taking custody of 2 young grandchildren.

I first saw this album during our Dotty for You promotion.  Vicki Wizniuk had made a super cute version of this album.  Her directions and pictures of the album can be found here.  I changed the layouts of the album to suit my paper and embellishments.  Here is my album:


Cover


Page 1


Page 2


Page 3

Page 4


Page 5


Page 6 and 7


 Inside Page 7


Page 8


Page 9


Page 10


Page 11


Page 12

I am sorry that I did not finish this while the paper pack was still current because I just love how it came out.  I will offer this mini-album again with one of our new paper packs in our next catalog so we will have plenty of time to use the current papers.

And here is a collage of all of the pages together.  Gotta love PicMonkey!


5/20/2013

Critter Week at H2H!


Welcome to this week's challenge at Heart 2 Heart Challenges.   Our challenge this week is artwork that features an animal, insect or critter of any sort.

I have been working on a mini album since last year.  I just love our retired Footloose paper pack and the complements that went with it.  I had seen a super cute album that Vicki Wizniuk put together last year using the Dotty for You Paper Pack and I just had to make my own summer album using that mini album design and the Footloose paper pack.  I am going to just  feature the critter pages in my book and then in the next few days I will reveal the rest of my album.  Hope you enjoy!


So now it is your turn!  Pick your favorite critter and show us your artwork.  Please go to  heart2heartchallenges.blogspot.com and post a link to your project.  I cannot wait to see what you make!

Here are a few rules:  
*Our challenges are open to everyone!
*To enter, follow the challenge of the week and post your results to your personal blog or other online gallery.
*Be sure to go here and direct link to your challenge post so we can see your artwork! 
*In order to enter a challenge, you must use Close To My Heart products but your project does not have to be 100% CTMH.
*If you use something from another company, please consider including details in your project's description.
* You MUST mention H2H challenges in your blog post (and a link back to us would be appreciated).
*Spread the word about our challenge blog by including our badge on your blog.
* I love to leave comments on our participants' blog posts, but word verification slows me down, so please turn yours off so that I can leave you some love on your blog!
*Most importantly, have fun creating - the Close To My Heart way!
Note: Any entries not following the above rules are subject to having their link removed.

Like my artwork?  You can make it too.  Take advantage of the Dream Pop Promotion during the Month of May on my Close to My Heart Website.  All you have to do is make a $35 qualifying order on my website and you can get this paper pack for only $10.  What a deal!


5/10/2013

How do you print your odd-sized photos for Scrapbooking?

When you scrapbook, do you only scrapbook 4" x 6", 5" x 7", or 8" x 10" photos?  Or do you do as I do and try and print larger photos than I need so that I can cut them down to remove a lot of the background?

Most of the time I use Walgreen's Photo Department because they are down the street.  But I find that sometimes I get the wrong size developed or I cut the picture wrong so I have to make a return trip or worse, more than one return trip to get the picture printed again so I can re-crop it.  Very frustrating and not so fun!  Also very expensive!

Close to My Heart has just come up with a solution to this dilemma:  Studio J!

You ask, how can a digital scrapbooking program solve this problem?  Check out this video and see some of the latest updates for Studio J.  Start the video at the 3:45 mark if you want to skip to the photo developing feature.


Wasn't that incredible?  And so economical as well.  A 2 page Studio J layout only costs $6.95 (plus shipping and handling and tax).  Do you know how many pictures you can place on a 2 page layout and get developed?  It depends on the photo size.  I am thrilled because now I won't have to keep resizing my photos and possible missing parts of the picture that I wanted to keep!

Are you curious?  It is free to try.  You only pay when you purchase. Click here and go see our new and enhanced Studio J!

5/08/2013

Jeanette Lynton and Close to My Heart


With all of the upheaval in the Scrapbooking Industry, I was delighted that the CEO of Close to My Heart posted this on her blog last Friday.  I love this company and am grateful that, as an Independent Consultant, that they are thriving in this Industry where others are not.

Creativity Now and Always

by Jeanette Lynton

Within the past month, paper crafters have heard and seen some hard news—well-known industry names have announced bankruptcy or removed their scrapbooking lines. It may leave many wondering what the future is for our beloved pursuit of memory keeping and creativity. As the CEO and Founder of Close To My Heart, I have many thoughts on the topic and wanted to share a few with you. 

First off, preserving our memories is NOT a fad. It's one of the most important things we do in our journey here on earth, and it's as key as breathing and as sustainable as family. In the past few years, we have seen scrapbooking come into the spotlight and many flocked to set up shop and design products to capitalize on it. While we at Close To My Heart have welcomed the focus on scrapbooking over the past few years, we know that even when the hubbub fades, the core and relevance underneath the hype remains. I have been in the industry for nearly 30 years—LONG before it was "trendy"—and plan to be in this essential industry for decades to come. 

Because Close To My Heart will be here for the long-term, we have run our business differently than many others. We are not leveraged to the hilt or financed by outside investors. I have always believed in organic, cash-based growth, and the simple provident rule of spending less than I earn. It's a principle I've applied to business and it's ensured that Close To My Heart operates profitably. We have been profitable month after month, year after year. Our credit rating is excellent, and this protects our commitment to delivering a wealth of diverse, beautiful products at competitive prices while providing secure commission checks for our Consultants, employees, and vendors. 

Second, yes, the industry is changing. I welcome and embrace that! In my 30 years in business, I have seen many changes and they almost always yield fresh directions, new products, and a new crop of crafters. Change always brings opportunity! I have long said that as long as little girls are born with hands, they will want to create. I am grateful to be a part of such an important contribution to society and know that this will continue. 

Ultimately, I invite everyone—whether you are an existing Consultant or customer, a past purchaser, or even if you have never purchased a Close To My Heart product—to get to know us again for the first time. Close To My Heart is strong. Papercrafting, memory keeping, and creativity are more important than ever before and we provide unique, diverse products for every style and ability of crafter.  Close To My Heart is committed to scrapbooking, and if it's a passion you share, then YOU ARE WELCOME HERE. 


I would love to talk with you about your opportunities in this incredible company.  You can find more information about becoming an Independent Consultant here or even hostessing your own gathering.  I love papercrafting and I agree that "as long as little girls are born with hands, they will want to create."

5/06/2013

It's Teacher Appreciation Week at H2H!

Welcome to this week's challenge at Heart 2 Heart Challenges.   Our challenge this week is Teacher Appreciation artwork.

We have 2 new additions to our house - two of my grandkids!  First let me tell you that the baby of my family is 26 years old and he left home 8 years ago.  My husband and I each have 5 kids for a total of 10 kids.  We have more grandkids that I can count on 2 hands and 2 feet, but we have enjoyed being Grandma and Grandpa.  Now two of our little ones, ages 7 and 10, have joined our household and we are now getting back into the swing of school, homework, and soccer.  So, Teacher Appreciation week is much appreciated.

I decided to make a cute little canister that I can fill with pencils and pens for the two teachers in our lives.  I stamped directly on our Kraft Canister with our black pigment ink.  I was so surprised about how easy that was to do.

I bet you don't recognize the black paper with the red dots.  It is our Dream Pop red embossed cardstock.  Because it is embossed, I took my black pigment ink pad and rubbed it onto the paper.  Then I took a paper towel and cleaned off the dots.

Here is my canister:


I had to add some silver glimmer trim.  The THANKS was cut out with the Cricut Artiste.


I used 3 different Close to My Heart stamp sets:  School Rocks (B1396), School is Here (B1407), and Casual Expressions (D1525).

So now it is your turn!  Show us what you can do with our Teacher Appreciation challenge.  Please go to  heart2heartchallenges.blogspot.com and post a link to your project.  I cannot wait to see what you make!

Here are a few rules:  
*Our challenges are open to everyone!
*To enter, follow the challenge of the week and post your results to your personal blog or other online gallery.
*Be sure to go here and direct link to your challenge post so we can see your artwork! 
*In order to enter a challenge, you must use Close To My Heart products but your project does not have to be 100% CTMH.
*If you use something from another company, please consider including details in your project's description.
* You MUST mention H2H challenges in your blog post (and a link back to us would be appreciated).
*Spread the word about our challenge blog by including our badge on your blog.
* I love to leave comments on our participants' blog posts, but word verification slows me down, so please turn yours off so that I can leave you some love on your blog!
*Most importantly, have fun creating - the Close To My Heart way!
Note: Any entries not following the above rules are subject to having their link removed.

Like my artwork?  You can make it too.  Take advantage of the Dream Pop Promotion during the Month of May on my Close to My Heart Website.  All you have to do is make a $35 qualifying order on my website and you can get this paper pack for only $10.  What a deal!


5/05/2013

Hopping With The Stampers With an Attitude!


Welcome to the Stampers with an Attitude Blog Hop.  The very artistic, Amber La Mons, is the Blogger right ahead of me.  I am sure that you have been WOWED by her artwork!

The Close to My heart team that I belong to, The Stampers with an Attitude, are all excited to show you a little Art with an Attitude, so here we go!

I made a slider card.  I found the pattern on Michelle Bowley's Blog and just had to try it.  I changed the measurements a bit to my favorite 5" x 7" card size.  So here it is!


 I used the Claire paper pack and Complements plus our adorable Hollyhock ribbon!

Sorry for the bad picture.  Tomorrow when the sun comes up I will take a better one! (Next day - Hah!  And I thought the sun would come up!  This one is a little bit better)


This card is a slider card that opens up to reveal the sentiment.  Loving it!

Now, hop on over to our next Blog hopper, the fabulous Cat Nowak!

See something you like?  Well I would love it if you would head on over to my website and see what Close to My Heart has to offer!