
Welcome to the Close to My Heart January Stamp of the Month Blog Hop! Can you believe that we are already into a new year? My goodness where did the old year go? We are featuring the January Stamp of the Month, Find Your Style, a set of 9 stamps, that is only available during the month of January.
If you have arrived from Mary Eisen's Blog you are on the right path. This month we have almost 60 Close to My Heart Consultants sharing their creations using the January Stamp of the Month and other great Close to My Heart products on their blogs. Following the Blog Hop is simple to do - just click on the link at the end of the post on each blog to move to the next one. So, here we go!
I am so excited about this stamp set. I think that Find Your Style Stamp Set is beautiful and I just love the name, don't you? The stamps are shown below.

I had a project in mind for a long time and decided to use it for this stamp set. I wanted to make tumbled tile coasters. I had tons of ideas rumbling around in my head and then got stuck. I couldn't decide which one to do and was afraid to make a mistake. I will tell you that it is hard to be creative if you are unwilling to make a mistake, so I just sat there looking at my tumbled tiles and my stamp sets as the deadline for the blog hop got closer. I went out with a friend a couple of nights ago and she is a cake decorator/artist. I asked her if this had ever happened to her. She told me to embrace my mistakes - to go ahead and create and to photograph my problems as well as my successes so that maybe others would learn from my mistakes or even improve on them. What a wonderful idea! So here we go.
Here are the basic supplies I used for all of the coasters:

I actually used two different types of tumbled tiles. One is called Travertine and the other one is called Noce. Noce is more rustic looking with holes here and there. Travertine actually has the holes filled in and is smoother. I found out in my experimenting that you could emboss on these tiles. WOW!
I stamped on the tiles and placed them on a cookie sheet in a 300 degree F. oven for 30 minutes. The more rustic tiles are just stamped with Stazon and the Travertine tiles I stamped with Stazon and then sprinkled clear embossing powder over it - just like you would emboss on paper, except with the heat of the oven instead of a craft heater.
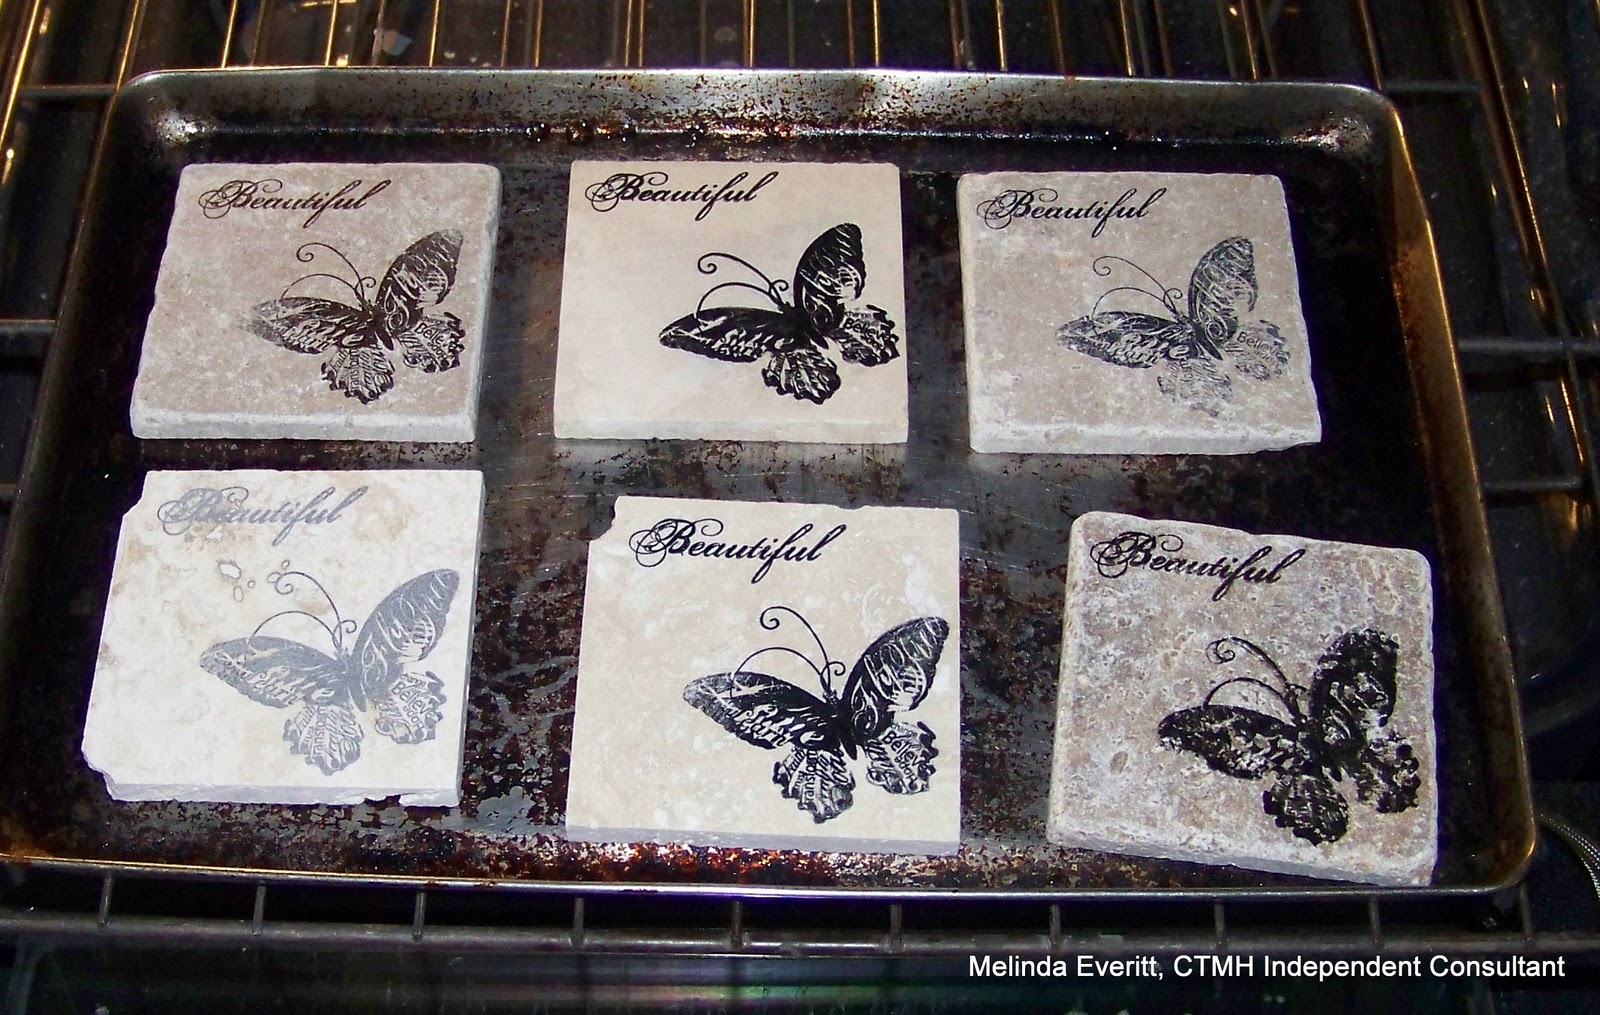
Here they are coming out of the oven:

First I will show you my black and white embossed tiles.


The problem I see with embossing in the oven is that I got a few bubbles and bleeding. I may play around with them again and see if the temperature matters.
This one was embossed with black ink, and then colored in with a blending pen and chalk. Then I carefully went over it with a Versamark marker and sprinkled clear embossing powder and back into the oven it went, same temperature and time.

This one was fun but I think I would change the colors next time. I used our DYE Ink and Versamark and then sprinkled with clear embossing powder, popped it in the oven and it worked! When I emboss with color dye ink, I first load the stamp with Versamark and then into the ink and then stamp. Here I used Autumn Terracotta and then rocked and rolled into Barn Red.

The last ones are my favorites.


They are all stamped with Stazon and then popped into the oven. Then I applied chalk to them and then sprayed them lightly with Krylon Matte Finish Acrylic Spray. I tested them to see if they were water fast and they were! After all of the coasters were done, I applied Krylon Gold Leafing Pen to the outsides and put self adhesive Felt Pads on the corners on the bottom of the coaster so they wouldn't scratch my table.
This would make a very nice gift and would be very inexpensive and takes little time. I see a workshop in my future!
Now "Hop" on over to Laurie Newton's Blog to see her work! Be sure to visit all of the Consultant's blogs to get some great ideas on how to use this versatile stamp set.
Remember that the Find Your Style Stamp Set is only available from January 1-January 31, 2011. Contact your CTMH Consultant or click here to see how you can get this stamp set at a discount or even free.


Great Idea! I never knew that you could emboss on the tiles! tfs!
ReplyDeleteWhat a great project and gift idea!
ReplyDeleteThese are great! What wonderful gifts these would make, too! So glad you shared them with us.
ReplyDeleteWhat a fun idea, I might have to try this. Thanks for sharing how you did these.
ReplyDeleteBeautiful coasters/tiles! Aren't they fun?
ReplyDeleteWhat a great workshop project idea- Thanks for the inspiration!
ReplyDeleteBeautiful Coasters!!~!
ReplyDeleteSo happy your friend encouraged you. Mistakes are part of the learning process, and so happy you shared what worked, and what didn't.
ReplyDeleteI love chalking on tiles - such a pretty & soft look.
I recommend that you pick up self-adhesive chair sliders or felt circles. These will help protect your furniture from scratches from the bottom of the tiles. Personally, I prefer the chair sliders, as they raise the coaster up higher.
Wow, what a fabulous project! They look great. You're braver than me.
ReplyDeleteWhat a beautiful assortment you created! Good job trying something new!
ReplyDeleteAbsolutely gorgeous! Where do you find the tumbled tiles and which ones did you use for your favorite? Beautiful work!
ReplyDeleteGreat project!
ReplyDeleteMy favorite tiles were the Noce tiles and they were the cheapest! I found both tiles at Lowe's but Home Depot has the Noce as well. If you are going to emboss, go with the Travertine and remember to wash all the dust off the tiles and let them dry overnight before stamping on them. I will also tell you that the Stazon trashed my stamps even with diligent cleaning and seasoning before use.
ReplyDeleteThese tiles are great! I love that you walked us through your learning process. I will definitely try this out.
ReplyDeleteThanks for sharing.
Melinda - this is a FABULOUS idea! What a fantastic gift, too! LOVE IT! I am definitely bookmarking this post! :) Thanks for sharing.
ReplyDeleteMelinda, these are gorgeous! I've always wanted to try this... so maybe now I'll be brave enough to try :o)
ReplyDeleteLove these tiles! So pretty - and I love how you shared details for each!
ReplyDeleteVery pretty tiles!
ReplyDeleteGorgeous Melinda, I am going to have to try these. I am so excited to start designing with you at H2H.
ReplyDeleteI tried making these and I had a hard time not smearing the stamped image. My tiles didn't seem to be flat/level and so I had to press real hard to get the entire image. But it wanted to smear. Did you have this problem?
ReplyDeleteJust taught my workshop with the tumbled tiles. Charmin, did you wash the tiles and let them dry before you stamped them? I wash my tiles and let them dry for about 24 hours and then stamped them without any problem. I also made sure that my stazon pad was nice and juicy. Even my beginner stampers did well.
ReplyDeleteYes, I washed them and let them dry overnight. I also used a brand new stazon pad that I just bought so it seemed pretty juicy. But the minute I stamped it down I could tell it wanted to slide.
ReplyDelete