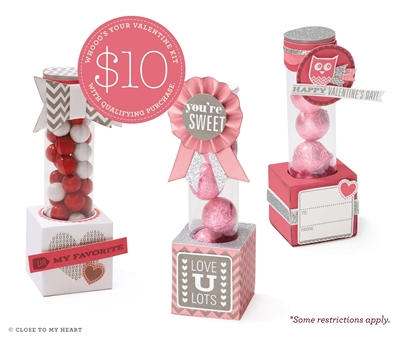
Aren't you just loving it? When you place an order of $35 or more in Close To My Heart products, you’ll receive the Whooo’s Your Valentine kit for only $10. Qualifying purchases must come from Autumn/Winter 2012 Idea Book product (or products live on my website through January).
Here is what you get in this promotion:
12 – Die-Cut Boxes (3 each of 4 colors: Blush, Hollyhock, Ruby, White Daisy)
3 – 12" × 12" Cardstock Sheets (Blush, Hollyhock, White Daisy)
1 – Sheet Silver Glitter Paper – new product for Spring/Summer 2013!
12 – Treat Tubes with Lids – new product for Spring/Summer 2013!
1 – My Acrylix® Whooo’s Your Valentine Stamp Set (D-size)
Isn't this promotion incredible? Head on over to my website starting December 13th and get your own Whooo's Your Valentine.
We have 32 Close to My Heart Consultants in this Blog Hop who are going to show you what they did with this awesome kit besides the picture above. If you found yourself here from Katy Donaldson Taylor's Blog, then you are in the right place. This is a circular hop so just follow the hop from blog to blog to see all of the awesome artwork.
For this blog hop, I made a cute little bag using the Cricut Artiste.
This darling little bag is cut out of Ruby Cardstock from the Cricut Artiste Cartridge. You can find it on pg 56 of the Cricut Artiste handbook. It is the Shift cut at 4 inches. I wanted a white doily look so I decided to heat emboss the doily part of the bag with Versamark and White Embossing Powder. Here is how it looks right after I have heat embossed it.
I used post-it notes to mask off the doily part of the box and then just rubbed the Versamark pad over that part. I then removed the post-it notes and poured the white embossing powder over the doily part. Then I heat embossed it. I love the look. Hope you do too!
Take a look at my owl. I inked up the bottom part of the owl in Ruby Ink and the top part in Archival Black. It was so easy to do and I think the owl is so cute! I cut the scallop shape on the Cricut from the Silver Glitter paper that came in this kit. The shape is from the Cricut Art Philosophy and it was cut at 1.75 inches. I am so jazzed that the glitter paper can be cut on the Cricut!
Here is a look at my little owl cluster. The black bow was cut from the Cricut Artiste cartridge, pg 55, at 5 inches. I finished my owl off with 2 red sparkles. Loving all of the glitter and sparkles! It's all about the BLING!
Here is one more picture of my owl gift bag. Not the best picture but I just realized that in my other pictures it did not look like a bag.
I want to share a picture of this adorable stamp set. It is a must have set!
I am going to put some 3" x 3" cards in my bag and give them to some friends. You could put a treat in them or even a card and a treat. I will post my cute little cards when I finish them so that you can see what else I can do with this stamp set.
Now it is time for you to go to your next stop, Michelle Loncar's Blog. Thanks for visiting and if you like what you see, I would love for you to become a follower of my blog. You can follow it with the link on the sidebar.


.jpg)

-001.jpg)
-001.jpg)


Love the little bug, TFS
ReplyDeleteOh very cute. Love the color choices!
ReplyDeleteLove you bag, and how you altered the doily! Thanks for sharing!
ReplyDeleteLove your treat bag.
ReplyDeleteAdorable!,,,
ReplyDeleteOh my gosh so CUTE!!!!
ReplyDeleteAwwww, darling!
ReplyDeleteThis is sooo cute! Love everything about it!
ReplyDeleteOMG this is SO adorable!!
ReplyDelete