
Welcome to the March/April New Product
Blog Hop!

This month I am following {Melissa Robinson's blog} We have 20 Close to My Heart Consultants participating in our March/April Catalog New Product Blog Hop. If you lose your place while traveling through our blog hop, the complete list of participants can be found here. Blog Hop!

Did you know that we have a brand new catalog that just went live? I am madly in love with the new Operation Smile Stamp Set, You Make Me Happy (D1920), and had to use it. Look at the adorable critters on this stamp set. With every purchase of this stamp set, $7 are donated to the life saving mission of Operation Smile™.
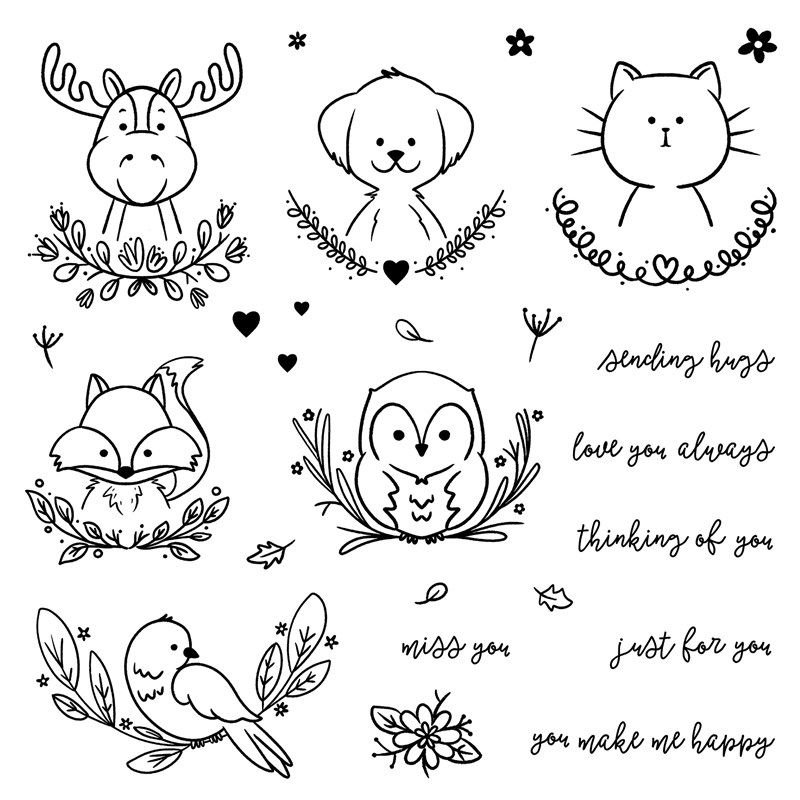
And they are so much fun to color with our Spectrum Noir Tri Blend Markers.
Here is my card:

My card has a couple of special features. I turned my cute little moose into a spinner shaker card. The shaker is filled with our new Silver Star Confetti. These are so much fun to put into the shaker -super fine so they don't clump up. Plus the shaker will spin! I have made a few of these and will probably make a few more.
When you open up my card, you will see a spot for a gift card! Isn't that great? And don't you just love the cheerful patterned papers found in our Mix-in Paper Packet (X9013)? I found this pattern on a blog today. Let me tell you how to make it.
Paper measurements
Thistle cardstock - 4.25" x 11", scored at 5.5" and 2.5"
Yellow patterned paper - 4" x 2"
Thistle diagonal patterned paper - 4" x 2.75"
White Daisy cardstock - 4 x 5.25"
Fold the Thistle cardstock at the 5.5" score line and then fold again at the 2.5" score line, making a pocket. Using a 1" punch, cut the notch out of the center of the outer edge of the pocket as shown. Adhere the two sides of the pocket, allowing room for the gift card to be inserted.
Adhere patterned papers as shown.

I am so excited about my spinner shaker card, I have got to show it in motion.
And now I want to tell you how to turn one of our shaker elements into a spinner. One of my fellow consultants, Charlotte Burns, made a card with a shaker spinner element and my interest was piqued. She hasn't had time to explain how she did it so I figured out how to make one.
We have this cool Card Front Spinner Thin Cuts to cut out the spinner element.
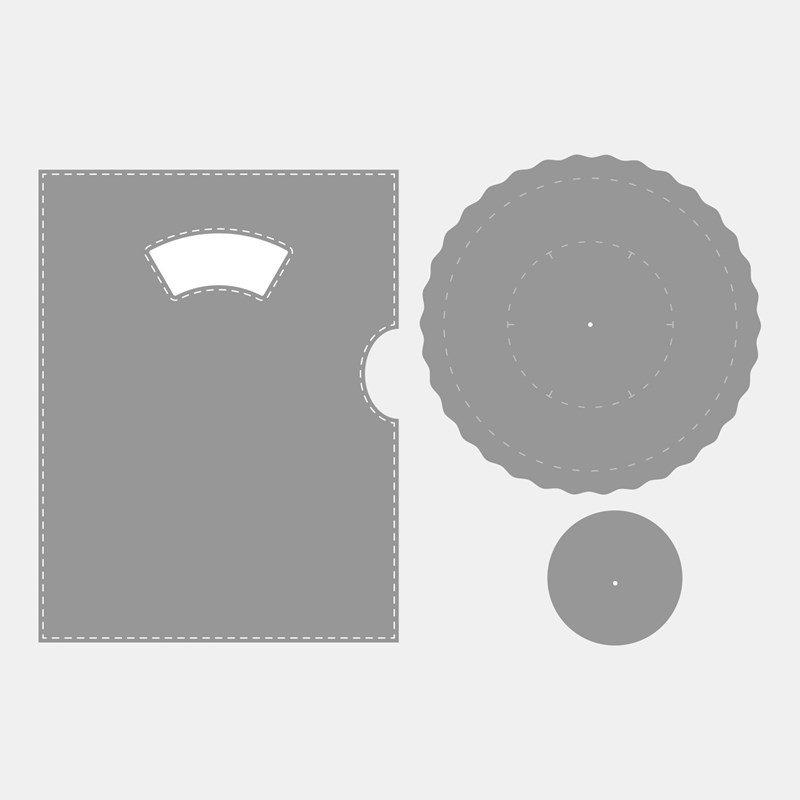
You cut out the large circle and 2 small circles. You will first take the large circle

in the Shaker Window & Confetti Thin Cuts like this and then I cut using my Cuttlebug.

I do this because I want the hole in the center so I can put the brad in the center to make my "spinner sandwich". Let me show you the sandwich.
 |
| Bottom |
 |
| Top |
I add Thin 3D Foam Tape as shown to top and bottom side of the "sandwich". First I make my shaker element and then I apply the top of the spinner sandwich to the underside of the shaker element, lining up the larger circle of the spinner to the shaker. Then I apply the entire spinner/shaker to the TOP of my project. This allows my shaker to spin. Sometimes I need to adjust the spinner small top circle so all moves freely.
The moose and the sentiment were stamped with Archival Black Ink Pad (Z3271).The moose was colored with the Earth Brown Blend Tri Blend Marker(Z2478) and the Brown Grey Tri Blend Marker (Z2475). The leaves are colored with the lighter and medium shades of the Light Green Blend (Z2485). The flowers are colored with the Purple Blend Tri Blend Marker (Z2492).
My moose's ears were colored with lightest shade of the Bright Pink Blend (Z2495).
The inside sentiment is found on the Birthday Hugs and Kisses stamp set (A1247). I colored the banner with the violet watercolor pencil and the Clear Shimmer Brush (Z3293).
Thank you for visiting my blog. I would love for you to show me a little love by leaving me a comment and then please go to our next artist, {Cat Nowak} and see what she has made with this adorable stamp set.
You can purchase this stamp set as well as any of the supplies listed above on my website.


WOW!! Love all the features of your card! so clever!!- Talk about "multi-tasking"- This card takes that term to a whole new level. Not only is the card lovely, it's interactive; spinning and shaking, plus provides room for a gift card. Amazing!
ReplyDeleteThere is just so much happening with this card. Wow, it looks fantastic.
ReplyDeleteLove that you combined the spinner with a shaker!! What a great gift card birthday card.
ReplyDeleteThis is genius! And such a cute card!
ReplyDelete