A group of local gals invited me to participate in a swap. We were each to make 12 Shabby Chic tags. My first impulse was to say no. I am pretty busy and I have never made a tag, much less a Shabby Chic tag. But I was excited to be included that I decided to go ahead and say yes and to do some S-T-R-E-T-C-H-I-N-G.
I got onto Yahoo and did an image search and you know what I found out? That apparently almost anything goes. Or at least others were as clueless as me on what Shabby Chic means in the papercrafting industry. Not overly reassured, but at least I had company.
First I decided that my excursion into the Shabby Chic field would include a retired Close to My Heart paper pack called La Belle Vie. I guess I wanted to go French Shabby Chic. Then I pulled out 3 CTMH stamp sets, Jardin (D1528), Bonjour (C1519), and the retired stamp set from the La Belle Vie Workshop on the Go (C1519).
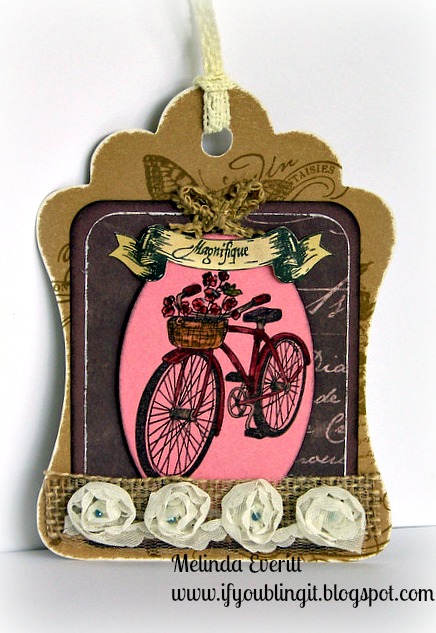
Here is my Shabby Chic Tag.
I am actually love, love, loving how this came out. I don't know if it is really Shabby Chic but I think it is pretty. I cut the tag out pf Desert Sand Cardstock with the CTMH Cricut Artiste cartridge, pg 32, Accent 1, 5.5" (height). I then sanded the edges and then did some random stamping with Desert Sand Ink so that it would not be so plain.
The next layer was cut out of a special color only available in the La Belle Vie paper pack, La Belle Vie Mauve at 4" x 3.25". I rounded the corners and inked the edges with Black Ink. The patterned paper was cut at 3.75" x 3". The corners were rounded and I took the edge of my scissors and roughed up the edges.
I then took Blush Cardstock and cut an oval out at 3.25" x 2.25". I have a Gypsy and that is easy to do. I am guessing that you can probably do the same with the Cricut Craft Room. I stamped the adorable bicycle from the La Belle Vie Scrapbooking Workshop on the Go with our black archival ink and then using my waterbrush, colored the bicycle in. My basket came out a bit blah (I used Desert Sand to color it) so I went over it with my Creme Brulee light marker and it brightened it up.
Everything is popped up because I have to have dimension and all of the ribbons are attached with my favorite liquid adhesive, Liquid Glass. I put little grey opaques inside the rosettes to add interest and applied some Liquid Glass to the flowers in the basket so that they would have a little Oomph!
So there you go, my Shabby Chic Tag. Hope you like it.
See anything you would like to buy? Then travel on over to my website and do a little shopping. You can even see our catalog there.


No comments:
Post a Comment
Thank you for taking the time to comment on my blog post!