Showing posts with label Video. Show all posts

7/26/2018

In Any Case... with Melinda and Melissa


Join us twice a month as we CASE, “Copy And Selectively Edit”, artwork created by the Art Department of Close To My Heart as showcased in the current Idea Books and our Make It From Your Heart How-To Books.
On the 2nd and 4th Thursday of each month, at 8 pm CT, we will direct you towards a piece of art and recreate it using the exact products or others that compliment its initial design. Tips, techniques and assembly directions will be shared in detail to help you recreate them on your own.
As you reproduce the items we have shared, post them on social media using the hashtag #ctmhinanycase. We will randomly search that hashtag and reward those who CASE our items. Winners will be announced on our blogs so be sure to follow us!

****************************************

In Any Case with ... Melinda


and Melissa


Good evening! I hope you had a great day. This week I decided to step away from the catalogs and spotlight our Make It From Your Heart, Volume 4 How-to book. Volume 4 shows 24 different card patterns and includes cutting instructions and artwork examples. I am CASEing card pattern #23 - the gorgeous card on page 51. Oh and what do I mean by CASE? Copy and Share EVERYTHING!


I used two different stamp sets on this card and one of the stamp sets also contains thin cuts. And do you know what is even better? The Falling for You - Scrapbooking Set (Z4144) is on Clearance for $9.75. The original retail price is $38.95. What a deal! I also used the mini stamp set, Delicate Flower (M1178) to make my patterned paper. I stamped using Memento Black Tuxedo Ink (Z899). The flowers and leaves were stamped onto the light gray paper from the Basics Paper Fundamentals.

I recorded a Facebook Live showing the techniques I used in making this card.

I apologize that it is recorded sideways but you can see what I am doing and how I watercolor the flower and assemble the card as well.

Here are the additional supplies I used for this card.

Now please head on over to my Partner in CASEing, Melissa Robinson, and check out how to make her cute little cards. I know I am going to head over there!

Tune in again, on August 16th, for the next episode and be sure to CASE one/all of the artwork we highlight and tag it  #ctmhinanycase on social media. We'll come looking for you and you may be a prize winner!

2/09/2015

Artfully Sent Series - Border Cards


Today I am featuring this super fast video that will give your more ideas on how to use the Close to My Heart Artfully Sent Cricut Cartridge.  If you don't own one, watching this may cause you to have to purchase one quickly.  These cards are stinkin' cute!


What I like about Border cards is that with a few patterned paper scraps, you have incredibly attractive 5 x 7 or 4 1/4 x 5 1/2 inch cards.  I am getting ready to fire my Cricut up right now to make that cute little fairy princess card.

I used the Border feature to make this card for my grandson.  It was very easy to make and so attractive and one of a kind.  He loved it!


By the way, the blue stars are actually our white stars colored with the Cerulean Blue ShinHan Marker.  I love that I don't need each color of embellishment, I can just take out my alcohol markers and color them.  
Supplies Used


1/05/2015

Close to My Heart Cricut Artfully Sent Cartridge


Have you seen our latest cartridge called Artfully Sent?  I was so excited when I bought this cartridge, but I was a bit overwhelmed when I opened the box and did not know where to start.  This short video will explain it a bit to make it easier to get started.


I love the way the Cricut handbook is uniform and each type of card can be found in the same place in the handbook.  I also loved all of the beautiful examples shown in the video.  Sometimes just a name of a card doesn't mean the same thing to each person.

Here is what comes in the Close to My Heart Cricut Artfully Sent Collection.


With this collection, you get 3 full size stamp sets that work well with cards, the Cricut cartridge, and a full packet of Daisy White cardstock.


Have questions?  Just comment here and I will get the answers for you.  Ready to purchase your collection now?  Click on the picture below to place your order.


10/14/2014

My Favorite Artfully Sent Adhesive


These are hands down my favorite adhesive to use for our Close to My Heart Cricut Artbooking and Artfully Sent overlays and cut images.  In the video below, Kristine will show you some other uses for these glue pens.  What I like about this glue is that for the Artfully Sent cut images, I can rub the glue pen over the piece quickly and  adhere the piece down permanently and easily before it dries.  The edge of the paper piece is held down well and it stays.  Love it!!!

Just be sure and place your piece on scrap paper and then apply the adhesive because otherwise you will have a sticky work surface.  Now go check out the very short video below.  You won't be sorry!

3/05/2014

Tutorial on How to Use Flip Flaps


One of the most popular products at my crops is our Flip Flaps.  They come in all different sizes and allow you to add extra pictures to your layouts instead of having to add pages.  One of my sister Close to My Heart Consultants, Lynn Como, made this video showing how she uses Flip Flaps in her scrapbooks.


And did you know that Flip Flaps can be used in Mini Albums and to even make cards?  I have got to show you a card that I made using a Flip Flap.


A very special one-of-a-kind card!  My granddaughter has already "called" this card.


2/25/2014

Tutorial on How to Assemble our Wonderful Close to My Heart Scrapbook Albums


One of the most asked questions from my customers new to Close to My Heart products is how to assemble our Close to My Heart post bound albums.  One of my sister CTMH Consultants, Lynn Como, has put together this video to show you how to easily put this album together.  It is far easier than you would think and results in a flat lying album that looks great on your shelf or coffee table.

Just remember to not skimp on the quality of your scrapbooking albums.  You spend so much time and money on designing and making your beautiful scrapbooking pages.  Why would you want to keep them in a cheap, flimsy album?


I absolutely love the look of our Faux Leather Albums.  They are made well.  The stitching around the edges lends a look of elegance to our albums.  We will be introducing a new line of albums in the next month and I will blog about them when they arrive.

Just to let you know that our Faux Leather Albums will be retired with this catalog and they are available while supplies last.  So be sure and get yours before we run out.

Our Albums


2/16/2014

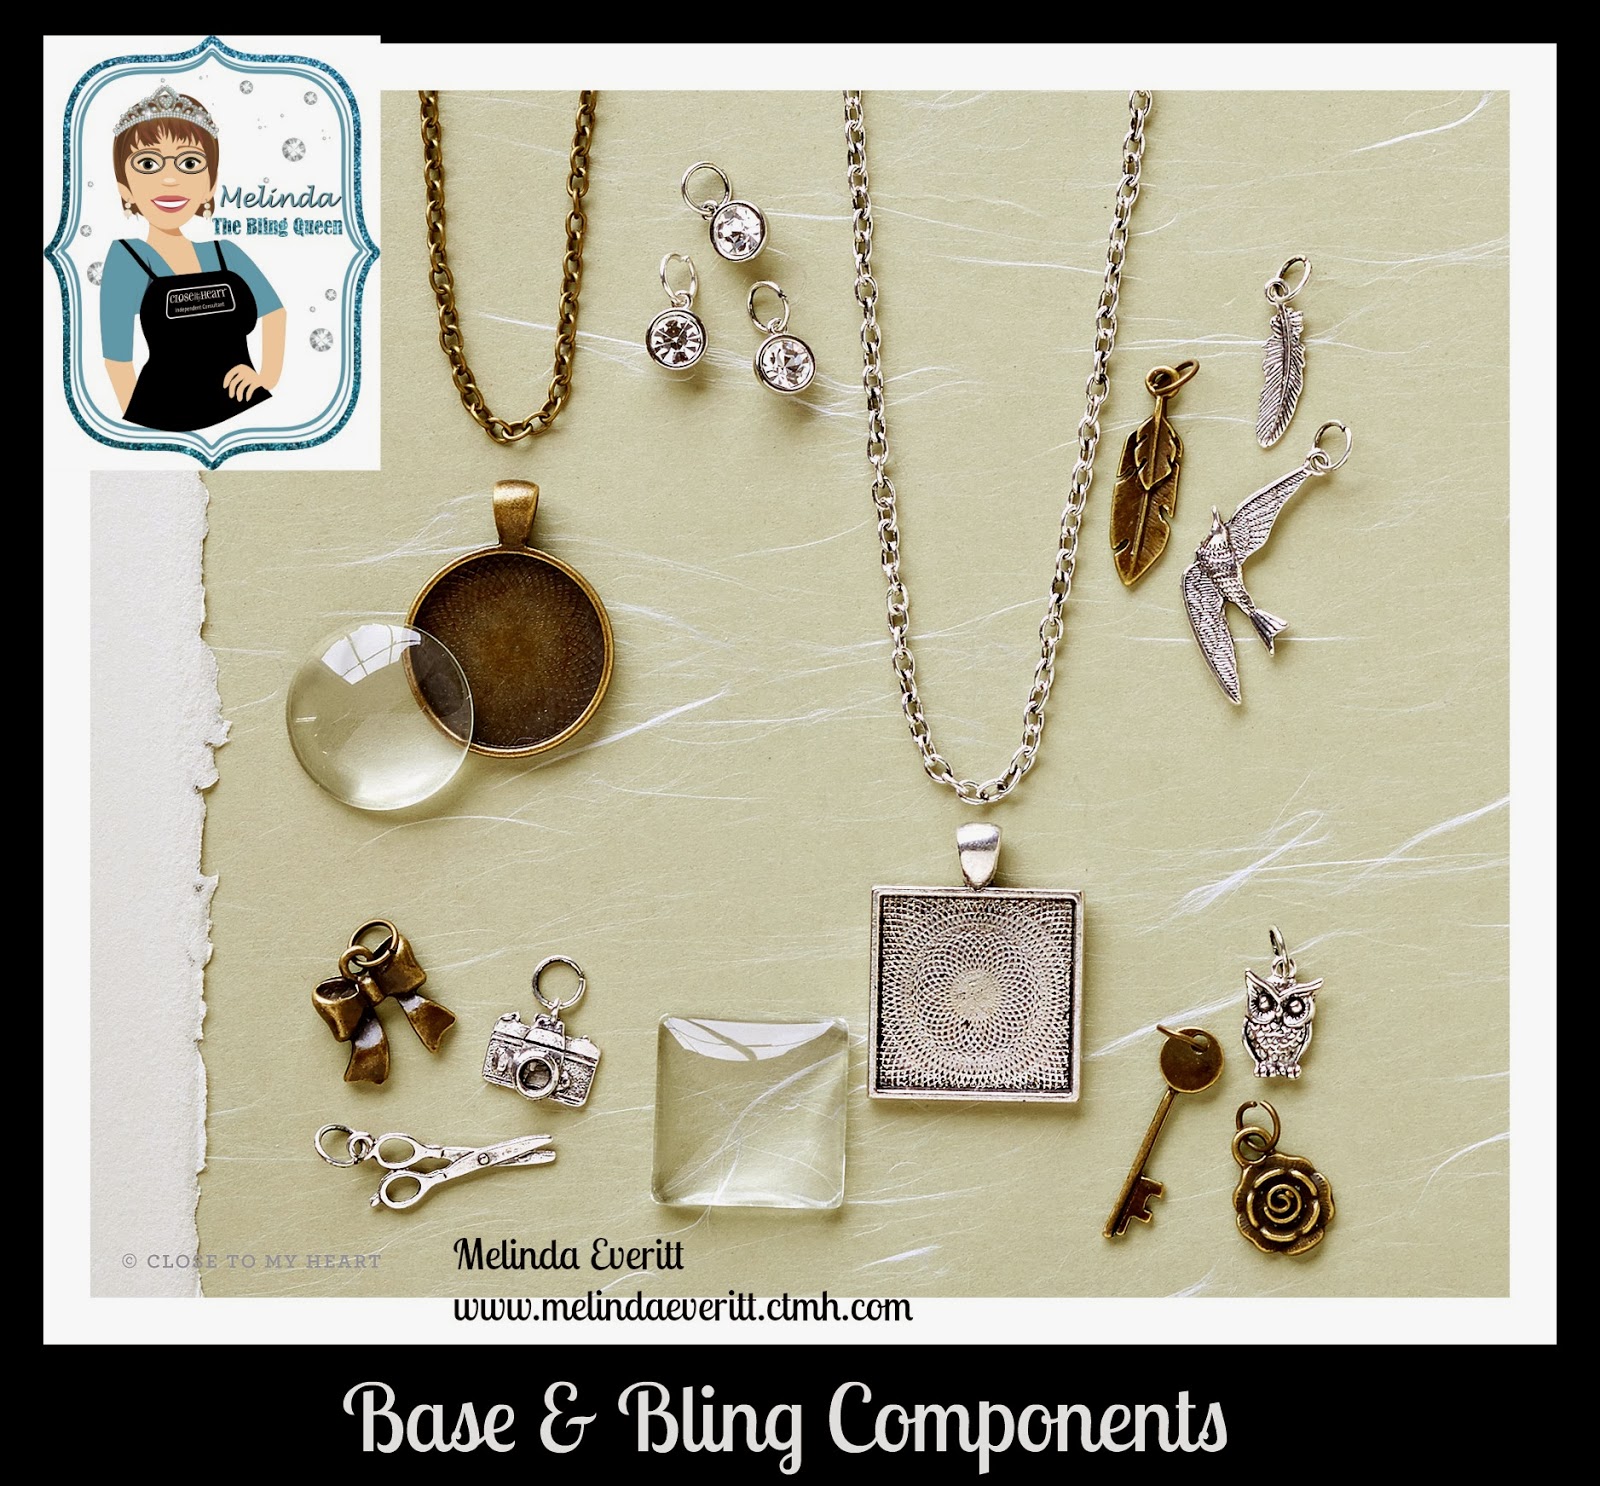
Check Out Our New Close to My Heart Base & Bling Pendants


Have you seen our new Base and Bling pendants?  These are so very "in" right now.  With our new Base and Bling line, you can make these necklaces at a very reasonable price and each one will be unique, reflecting your taste and creativity.  This very short video will tell you a bit about this line and then I will tell you how to assemble them.  They will take you 5 minutes tops to put together once you have made your choice of colors and pendant background.


My team just finished our Spring Stamp Camp and we made these super cute pendant necklaces at the Camp.  Not one person had a hard time assembling their pendant.  We could not believe how easy it was to make and in 15 minutes, we had a finished necklace.

Let me tell you a bit about these necklaces.

The chains and pendant backs come in two colors - Faux Antiqued Gold and Faux Antiqued Silver. The chains are 30 inches long.  The pendants come in a 1" square or a 1" circle.


The pictures are actual decals.  We have 4 different decal sheets, each with it's own theme and there are 32 decals on each decal sheet.  The decals are self adhesive so they are easy to apply to the pendant back.  The pendants come 3 to a package as do the crystal covers.

Then there are the cutest little charms that come six to a package that you can add to your necklace to make each necklace an individual piece of art.


Let me give you some tips and tricks on how to assemble your necklace.

  • Cut your chosen decal off of the decal sheet, remove the decal, and really push it onto the pendant back.  The decal must be firmly adhered to the back of the pendant so that it doesn't bubble up.  For a circular pendant, either use a 1" circle punch to cut out the decal or take the round crystal, place it over the decal, draw around it and then cut it out with your scissors.
  • Place a large bubble of Liquid Glass in the middle of the pendant over the decal and then place the crystal over the Liquid Glass.  Watch the Liquid Glass flow to the sides of the pendant.  After it stops moving, push down lightly on the crystal, wiping any Liquid Glass that oozes out with a damp paper towel or baby wipe. You want the Liquid Glass to reach the edges of the pendant.
  • Hold down on the crystal/pendant for several seconds so that the seal is nice and strong.
  • Set it aside for 15 minutes so that it can dry and then thread it onto the chain and add any charms you would like. The charms have little jump rings on them so that you can easily add them to your chain.
                                                                    Supplies Used


HTML tutorial

12/05/2013

Subway Speak, Close to My Heart Style


I so have to do this.  I am decorating my creative space and wanted to come up with something creative, fresh, and exciting.  I am so loving this.  Take the time to watch the video.  It is worth it!


12/04/2013

Artbooking Made Easy - Friendship Layouts


I am loving that not only has Close to My Heart brought out a fantastic Cricut Cartridge, but they are supporting it with this series of Videos that show you how to use it.

This video shows you how to use the Friendship key to produce a variety of different layouts.


12/03/2013

All Play and No Work! Contest


I would love to see one of my readers win this fantastic Contest posted on our Founder and CEO's blog!

"Piecing together a layout is a breeze when you’ve got the right ingredients all in one place. When you have Close To My Heart’s Workshops on the Go™kits that breeze turns into a gush of wind, because all the ingredients are in one place, and for a wonderful deal! If you’ve got adhesives handy, each workshop will appear quickly before your eyes. They are so convenient and simple to assemble that the term “working on a layout” is all wrong. This is play!"

All you have to do to enter is go to Jeanette Lynton's Blog and leave a comment.  Now how easy is that?  Leave your comment by December 31, 2013 and you just might be one of 20 winners!


8/20/2013

What is New With Close to My Heart Stamps?


This new catalog has brought many changes in our line of stamp sets.  I as going to discuss them in a blog post and then Kristine from Close to My Heart made this short video that shows some awesome artwork and gives a fantastic update in our stamp set product line.  Take a few minutes to watch and then let me know by leaving a comment what you thought of our new line of stamp sets.


7/26/2013

Preview CTMH Artbooking on Big Picture Classes Pajama Party

Close To My Heart is teaming up with Big Picture Classes again to bring you a live webcast with step-by-step instructions for making this layout using the Cricut® Artbooking collection. Purchase the collection beginning August 1, 2013 and revolutionize the way you scrapbook! Or take advantage of my Cricut Artbooking Preorder and save more than $35 plus get your cartridge faster!
The FREE webcast will air Wednesday, July 31 at 8:00 pm (CDT). During the presentation, you’ll learn to make several projects from a variety of sponsors, including Close To My Heart’s Artbooking layout, as our very own Kristine Widtfeldt walks you through the steps—and gives you a sneak peak into the Artbooking collection!
The Pajama Party class will be available for FREE at BigPictureClasses.com on July 31, and will be archived after the event for future viewing. If you would like to interact on the message board, participate in live chat, post to the gallery, download handouts, or enter any contests, you will need to log in to the Pajama Party “classroom” by creating a free account on the Big Picture Classes website. If you have already created an account or if you registered for the first Pajama Party in May, you are all set! You will not need to create another account or register again.
We hope you and your friends (Yes, spread the word!) enjoy this sneak peek of the new Artbooking collection as Kristine Widtfeldt, Stacy Julian, and the rest of the Big Picture Classes crew make the featured project and share their tips and tricks for using the collection. We know your customers will be chomping at the bit to make the Artbooking layout, so take this opportunity to have them sit back, relax, and drool over the items, then be ready to spring into action August 1 when they can buy the collection with the rest of the supplies. Then you can tune in to the archived event for step-by-step details on how to make the project.

7/18/2013

A Close to My Heart Update


With the recent bankruptcies of some major companies in our industry and the scrambling by their customers to purchase the materials they need to finish their projects before they can no longer buy these products, I find it very comforting that Close to My Heart is debt-free and not in danger of going out of business.

I know that when I purchase my papercrafting supplies, that when I need more, Close to My Heart will still be there.  There have been a few statements made by these companies who are in bankruptcy that scrapbooking is no longer popular.  Well, as evidenced by the increased attendance at my crops, I don't believe that and neither does Close to My Heart.  Please listen to this short video about the state of our company entitled, "You are Welcome Here."


I love Close to My Heart products and love that they are innovative and stable.  Bar none, we have the best New Consultant kit at the cheapest price.  We make it easy for you to join Close to My Heart as a customer or a consultant.  I joined Close to My Heart 5 years ago in order to get a discount on my papercrafting supplies and I have found a true home with the fellowship of some awesome ladies and gents.

We just released our New Consultant Kit for the 2013 Autumn/Winter Idea Book.  If you are interested in receiving $155 of product for only $49 or you just want to see what is in the kit, you can find more information here and I have even answered some frequently asked questions.  And did you know, that as a Close to My Heart Consultant, you can even get our new Cricut Artbooking cartridge with your discount?

7/16/2013

Need Creative Memories Page Protectors?


As Creative Memories is progressing through bankruptcy, there is talk that they will not be carrying their line of traditional scrapbooking supplies as we know them.  Many people entered the art of scrapbooking through Creative Memories, as did I.

So, what do you do when Creative Memories albums, pages and page protectors are no more?  Well here is one of our newer Australian Close to My Heart Consultants and former Creative Memory Consultant, Shauna Richards, to show you how.

After you watch the video, you can see the American prices and information for the Close to My Heart page protectors by clicking here.


7/11/2013

Video Using Cricut Craft Room with Close to My Heart


First of all I have to say that I love my Gypsy.  Once I started using the Cricut, I discovered that I could not do what I wanted to do with it and that I needed the Gypsy.  I love it and have never looked back.  Until now.

There is a free program out there called the Cricut Craft Room.  It is free and looks pretty easy to use.  I have my fingers crossed that it will work on my iPad 2.  With the Cricut Craft Room, it looks like I can use it to do what I have been doing with my Gypsy and if I can use my iPad 2, I can actually see it better to do it since the screen on my Gypsy is pretty small.  I will report back here after I have played with it a bit.

So watch this video with the beautiful Monica Wilhongi and see if the Cricut Craft Room is as exciting to you as it is to me!


6/10/2013

Close to My Heart Mini-Banner Ideas


I am posting this totally out of a selfish reason.  I want to make sure that I can find this awesome video so that I can create some of these super-cute banners.  I know that my grandkids would love to have these made and hung on the wall behind their beds.  I also think that I am going to make a create banner for my art room and a party one for those special days at my house.  My family is just going to love them!

During the month of June, Close to My Heart is offering a special where you can get this Mini-Banner totally free with a $25 purchase that includes an A, B, C, D or E sized stamp set.  Woo Hoo!  This is while supplies last only.  Here is the link to my website if you want to take advantage of this offer.  I am headed off to purchase some right now before they are gone....


5/10/2013

How do you print your odd-sized photos for Scrapbooking?

When you scrapbook, do you only scrapbook 4" x 6", 5" x 7", or 8" x 10" photos?  Or do you do as I do and try and print larger photos than I need so that I can cut them down to remove a lot of the background?

Most of the time I use Walgreen's Photo Department because they are down the street.  But I find that sometimes I get the wrong size developed or I cut the picture wrong so I have to make a return trip or worse, more than one return trip to get the picture printed again so I can re-crop it.  Very frustrating and not so fun!  Also very expensive!

Close to My Heart has just come up with a solution to this dilemma:  Studio J!

You ask, how can a digital scrapbooking program solve this problem?  Check out this video and see some of the latest updates for Studio J.  Start the video at the 3:45 mark if you want to skip to the photo developing feature.


Wasn't that incredible?  And so economical as well.  A 2 page Studio J layout only costs $6.95 (plus shipping and handling and tax).  Do you know how many pictures you can place on a 2 page layout and get developed?  It depends on the photo size.  I am thrilled because now I won't have to keep resizing my photos and possible missing parts of the picture that I wanted to keep!

Are you curious?  It is free to try.  You only pay when you purchase. Click here and go see our new and enhanced Studio J!

4/23/2013

Close to My Heart Creating with Canvas

I have had many questions about how to add photos to our canvases.  I am delighted that Close to My Heart decided to make a video on how to do exactly this.  Now I have to order another one of our delightful little canvases so that I can make this myself!  I see a workshop in my future.  This is a must see video!


Like what you see?  You can order it here.

3/13/2013

Using Fabric on Your Artwork

Learn great tips and techniques for using fabric in your artwork—where to use it, how to adhere it, and how to create ruffles, flowers, and much more! Close To My Heart's new line of beautiful textiles make it simple to embellish cards, layouts, and three-dimensional items with fabric.

This is a great, short video that shows how to use fabric in your artwork.  There are a couple of gorgeous layouts on this video that have fabric on them.  I am going to try making the cover layout with my granddaughter's picture.  


12/14/2012

Let Me Show You How Easy It Is to Put Together the Whooo's Your Valentine Treat Tubes


I am absolutely LOVING this promotion and the super cute stamp set that comes with it.  SO much that I wanted to share with you a video that shows you how easy it is to put our treat tubes together.  I can really see how much fun this would be for you to get together with your kids and grandkids and make enough treat tubes to give out as classroom valentines.  Now wouldn't that be the best Valentine that they receive!

So how do you get this adorable kit that is worth $40?  So glad you asked.  When you place an order of $35 or more in Close To My Heart products, you’ll receive the Whooo’s Your Valentine kit for only $10. Qualifying purchases must come from Autumn/Winter 2012 Idea Book product (or products live on   my website   through January). 

Here is what you get in this promotion:

12 – Die-Cut Boxes (3 each of 4 colors: Blush, Hollyhock, Ruby, White Daisy)
3 – 12" × 12" Cardstock Sheets (Blush, Hollyhock, White Daisy)
1 – Sheet Silver Glitter Paper – new product for Spring/Summer 2013!
12 – Treat Tubes with Lids – new product for Spring/Summer 2013!
1 – My Acrylix® Whooo’s Your Valentine Stamp Set (D-size)


Isn't this promotion incredible?  Head on over to my website and get your own Whooo's Your Valentine.  
This promotion is available through January 31, 2013.